

Here are tactics for the use of tanks and armoured vehicles in an Imperial Guard army. First I will give you the basic formations for tank platoons, then we will move on to specific tactics for the use of these formations. There are five basic formations used by tank platoons. These are the Column, the Line, Echelon Right/Left, the Wedge, and Refused Flank.
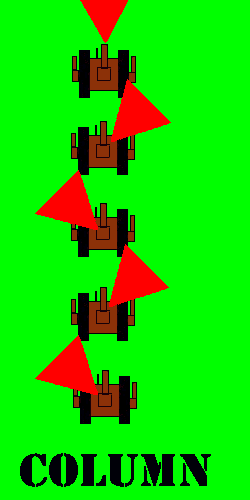 Tanks in column can advance and maintain
alignment by following the leader. Since the formation is easy to maintain, it is
used for moving a platoon up to the battle front quickly. A column is not, however,
a good battle formation. Even though The platoon can cover its own flanks only the
lead tank can fire to the front.
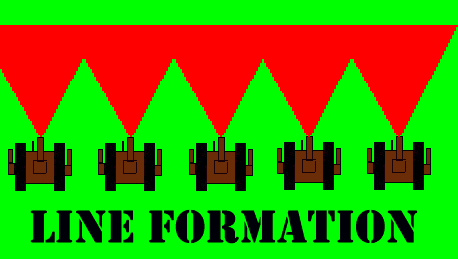 The line formation gives maximum firepower forward but the formation leaves
the tanks exposed to ambush from the flanks, and it is difficult to maintain. The
tanks must maintain even spacing and alignment for maximum effect.
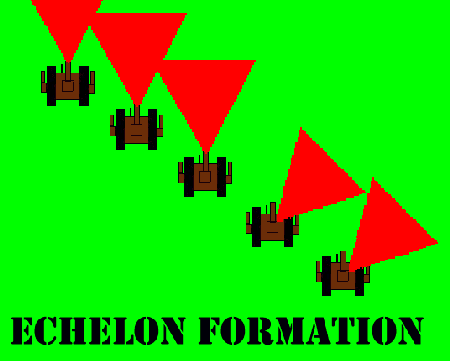 The Echelon Right (or Left) has
advantages of both the Line and Column. It offers full firepower directly ahead or
to one flank.
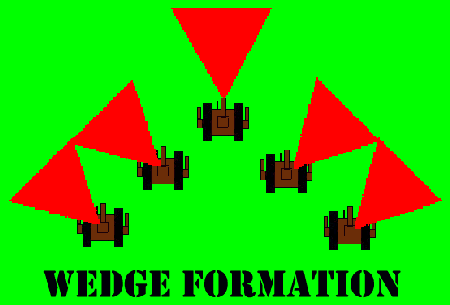 A Wedge is the best formation to meet every
possible contingency. All tanks in the unit can fire straight ahead, and at least
three tanks can cover either flank.
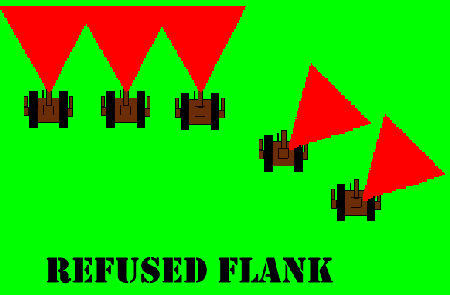 The refused flank formation is used when
a line formation is passing a potential danger spot, such as a woods, a building, or other
cover that contain an enemy. A couple of tanks drop back in Echelon to protect the
flank. Once the hazard has been passed, the two tanks on the flank accelerate to
rejoin the line.
The above formations are the classic tank formations. Now we will see how we can use these on a 41st millenium battlefield.
Let us get the Line out of the way. Its only purpose is to move forward laying down fire over the widest possible area of the line.
The Column is only going to come into effect during certain specific scenarios, when you are having to move your army in column.
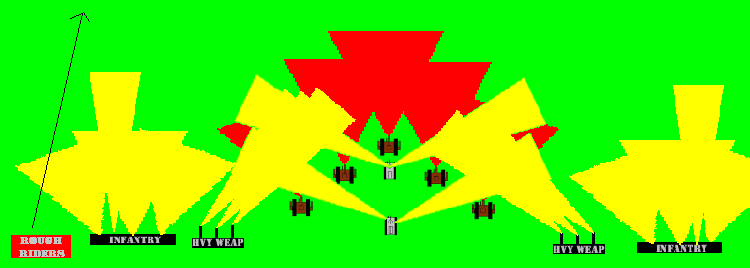
This is the proper way to use a Wedge Formation of armoured vehicles to penetrate the center of your enemy's battle line. The red fields of fire ae the firepower of your tanks, the yellow fields of fire are supporting fire from anti-personnel weapons on your Chimeras such as the multilaser, heavy bolter, and lasguns. The heavy bolters on your Chimeras will keep infantry off of the vehicle directly ahead, while your multilaser and lasguns fire through the gaps between the tanks. The heavy weapons squads should have good anti-personnel weapons such as heavy bolter, missile launcher, and autocannon. They should fire along the line just ahead of your Wedge Formation, going down the flanks, aiming at an area forward of your lead tank. Your infantry squads should have a more powerful anti-vehicle weapon, as they will have to defend your flanks. Concentrate your fire in killing fields, and this formation becomes a death trap for any infantry that tries to close assault your vehicles. Once you have driven through the enemy line, you can take the two tanks on each flank and fire into the enemy's line and rampage behind the line with your lead tank, but keep your infantry supporting them. Also, once you have punched through your enemy's line, unload your infantry squads from your Chimeras so that they can add their firepower to that of your tanks and help keep enemy infantry off of your tanks. Use your Rough Riders to create a threat to your enemy's flank. The Rough Riders can be used on either or both flanks. Their main job is to divert enemy units away from your armoured fist and to help protect it.
The Echelon can be used in specific situations, and you should support them with variations of the theme above.
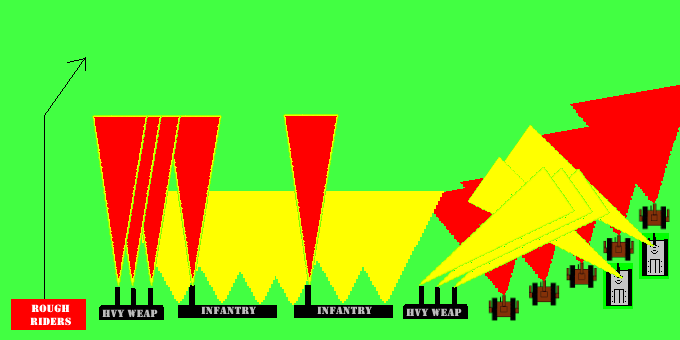
Here we are using an Echelon Formation of tanks coming on on the right flank with mechanised infantry support. You will notice that once again each tank is able to support every other tank and all tanks are covered by anti-personnel firepower from the Chimeras and heavy weapons teams in the heavy weapons squad. You have infantry holding your line, which will advance as opportunity allows and you have heavy weapons on your opposite flank that are able to destroy vehicles, etc. You also have a mobile, hard hitting close combat unit in the Rough Riders. The object of this is to advance your tanks into the flank of your enemy, concentrating as much firepower as possible on a localized area. Once this flank of the enemy is destroyed and/or broken, you can turn upon the rest of his line and destroy it in detail. You must use terrain to your best advantage (terrain was left off of the illustration for clarity's sake only, there will always be at least some terrain on any battlefield). Remember, the key is combined arms.
In either of the two attacks above, you should also use bombardment and any artillery you have in support of your tank unit.
If you are allowed Vehicle cards, use ones that will add to the armour and survivability of your tanks, and aid their speed. I have found that in most instances points are better used for more units than they are for heavily tooling up certain units.
I would have a Command Squad armed for assault and given the Hardened Veteran ability in one of my Chimeras in the fist. I would also give Hardened to the other infantry unit riding the other Chimera. The Heavy Weapons teams should be given either Slick Crew or Dead Eye Shot to increase their ability to destroy infantry. Between your heavy tank guns and the many anti-personnel weapons, all converging on an area of the enemy's line, you should do substantial damage.
Once more, I must say, make sure you maintain the interaction of all your units and the covering fire for your armoured fist (tank Wedge).
Remember to stay flexible in your thinking and watch for opportunity. If opportunities present themselves for wheeling this formation to do more damage, take advantage of it! Do not ever lock yourself into one scenario only.
This Tactics article is copyright (c) Thomas Setzer 1997.